Why Your EV Charger Is Running Slow
EV charging has gotten complicated with all the conflicting advice flying around. And when your charger starts underperforming, the whole thing feels maddening — especially because nothing looks wrong. The unit powers on. The car accepts the charge. No smoke, no sparks, no error codes flashing at you. But you’re pulling 3 kW when the charger is rated for 7.7 kW, and that gap is the difference between a full battery by morning and a half-charged car at 6 a.m.
Three things cause this. Your car has a built-in charge rate limiter you’ve probably never touched. Your charger shipped at a conservative amperage default — most people never adjust it. Or your home electrical setup is quietly throttling the whole operation. Wiring gauge, breaker size, shared loads. The order you check these matters, because the first two take five minutes to fix. The third one might need a meter or an electrician.
Check Your Car’s Charge Rate Setting First
Probably should have opened with this section, honestly. I spent two weeks convinced my Level 2 charger was defective before discovering my Chevy Bolt had a charge-rate cap buried three menus deep in the vehicle settings. Two weeks. Don’t make my mistake.
Most EVs let you limit charging speed on purpose — to preserve battery longevity or to avoid peak electricity rates. It’s a genuinely useful feature. It’s also easy to activate by accident or forget you turned on six months ago during a time-of-use experiment.
Tesla owners: Open the Tesla app and go to Controls > Charging. Look for “Charge Current.” It defaults to max, but if someone slid it down at some point, you’ll see the reduced amperage right there on screen. Slide it back up.
Chevy Bolt or Equinox EV: Use the in-car touchscreen. Tap “Settings,” then “Vehicle,” then “Charging.” You’re looking for “Charge Rate” or “Maximum Charge Rate.” Options are usually Low, Medium, or Maximum. Set it to Maximum unless you have a specific reason not to — and you’d know if you did.
Nissan Leaf: Hit the menu button on the dash, navigate to “Charging,” and find “Charging Rate Control.” Nissan defaults to a slightly reduced rate on certain trims. Move it to the highest available setting.
Ford F-150 Lightning: Use the Ford BlueOval Charge app or the in-truck interface. Go to “Charging Settings” and check “Charge Rate.” Ford lets you set it by amperage — usually 32A max for Level 2 — so push it to the maximum your home electrical service can actually support.
After you’ve adjusted the setting, leave the car plugged in and wait about 30 seconds. Most EVs update the charge rate live. Your kW reading should jump within a minute.
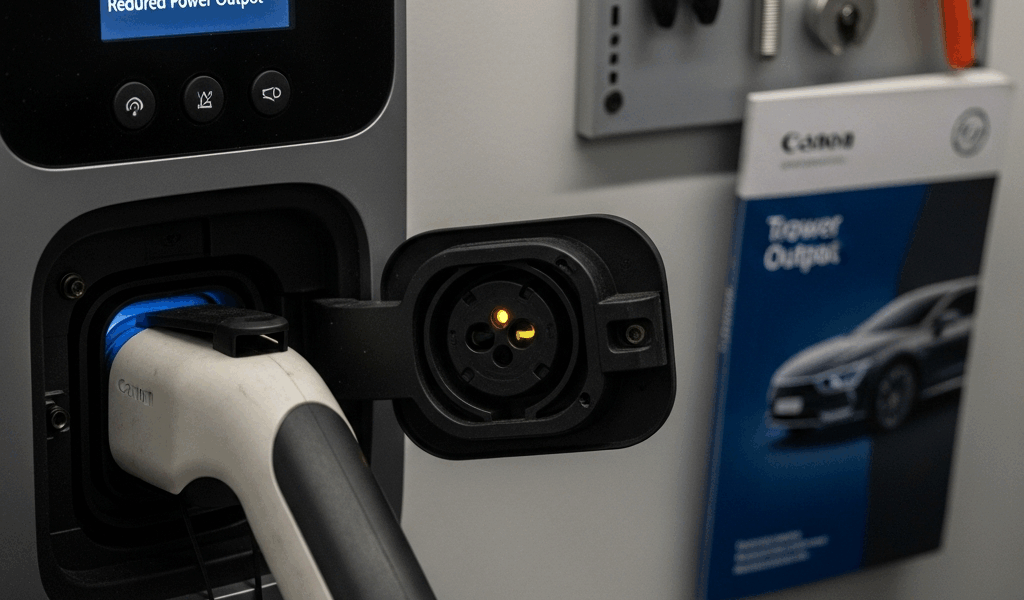
Check Your Charger’s Amp Setting
But what is a charger’s default amperage setting? In essence, it’s the ceiling the manufacturer programmed before shipping the unit. But it’s much more than just a factory number — it’s often the reason you’re leaving 4 kW of free performance on the table every single night.
Charger manufacturers are cautious. A JuiceBox 40, a ChargePoint Home Flex, or an Emporia Level 2 unit frequently arrives configured for 16 amps even when your home can handle 32 or 40. Liability and safety-by-default are the reasoning. That’s fine. Your job is to reconfigure it based on your actual circuit.
Here’s the math that makes this concrete. Amps times volts equals watts. Level 2 runs at 240 volts. So 16 amps × 240V = 3.84 kW. Jump to 32 amps and you’re at 7.68 kW. That’s the real gap between glacial overnight charging and something actually acceptable. If your breaker panel and wiring support it, this adjustment costs nothing.
Smart chargers via app: Open the ChargePoint, JuiceBox, or Emporia app. Find the “Settings” tab and look for “Amperage,” “Max Amperage,” or “Charge Rate.” These apps let you adjust in 1-amp increments — I’m apparently particular about this and the JuiceBox app works for me while some third-party dashboards never update correctly. Before changing anything, check your breaker panel first. More on that below. Set the amperage to a value the circuit can safely handle.
Dumb chargers or physical controls: Older and entry-level chargers sometimes have a physical dial or button on the unit itself. Check the side or back of the housing for a knob labeled “Amps” or a row of small buttons. Many have a tiny LED display that cycles through settings when you press and hold. If the interface isn’t obvious, search the model number plus “PDF” — the manual will be on the manufacturer’s site.
Plug in after adjusting and wait about 10 seconds. The charger should restart and reflect the new power level on its display or in the app.
Rule Out a Wiring or Circuit Problem
The electrical investigation comes last — which is exactly where it belongs. If both settings were already maxed and the charger is still underperforming, your home wiring is the culprit.
Undersized wire gauge or a shared circuit creates resistance the charger actually senses. You’ll see the unit trying to pull full power while the car reports 5 kW instead of the rated 7.7 kW. Or you notice charging speed drops every afternoon around 3 p.m. when the air conditioner kicks on. That’s a shared load problem.
Here’s the DIY diagnostic. Open your breaker panel and find the breaker feeding the EV charger — it should be labeled. The breaker rating is printed on the switch itself. Typically 40, 50, or 60 amps. A 40-amp breaker safely delivers 32 amps continuous. A 50-amp breaker handles 40 amps. If your charger is configured to pull more than the breaker supports, it throttles down automatically to protect the circuit. That’s not a charger failure. That’s the system working correctly on a mismatched setup.
Also worth checking: is the charger on a dedicated circuit, or does it share a breaker with outlets, lighting, or a garage subpanel? Dedicated circuits are code for new EV installations. Older retrofits sometimes cramped the charger onto an existing 20-amp general circuit — I’ve seen it twice in houses built before 2010. That’s the problem if so.
If the wiring was undersized during the original installation — 8-gauge wire where 6-gauge was needed, for example — that’s a permanent limitation. You’ll need an electrician to upgrade the run. Budget somewhere between $500 and $2,000 depending on distance and local labor rates. That was the range in 2023, anyway.
When Slow Charging Points to Something Bigger
Steps one through three solve roughly 95 percent of slow-charging complaints. If you’ve maxed the vehicle settings, adjusted charger amperage, and verified the circuit — and it’s still slow — the remaining causes are hardware failures or battery-management behavior.
The charging cable. A damaged J1772 connector or Tesla connector introduces resistance that limits power. Look for visible cracks, corrosion on the contact pins, or any discoloration that looks like heat damage. If the cable looks compromised, the charger manufacturer should replace it under warranty. Most cover this in the first two years.
The EVSE unit itself. Chargers do fail — it’s rare, but a failed contactor or faulty relay inside a JuiceBox or ChargePoint can cap output at 50 or 60 percent of rated power with no obvious error. If you’ve eliminated settings and circuit and the problem persists across multiple sessions over several days, contact your charger manufacturer directly. Most warranty replacements ship within two weeks.
Vehicle-side battery management. Some EVs deliberately throttle charge rate when the battery is very cold or when the pack is already near full. Tesla does this. So does the Bolt. If you’re charging a cold car in January at 7 a.m., allow 10 to 15 minutes of app-triggered preconditioning first. If the pack is sitting at 88 percent, the car may drop to 2 or 3 kW regardless of what the charger is capable of. That’s normal behavior, not a malfunction.
That’s what makes EV charging endearing to those of us who’ve spent time with it — it’s a system with a lot of moving parts, and most slowdowns have a mundane explanation. But if you’ve worked through everything above and nothing changed, contact your EV manufacturer’s support line or your original charger installer. You’ve eliminated the fixable stuff. A technician will pull diagnostic codes and either authorize a replacement or flag a vehicle-side battery issue. You’re out of the DIY troubleshooting zone at that point — and there’s no shame in that.


Stay in the loop
Get the latest northwestevcharge.com updates delivered to your inbox.